Monday, June 15, 2009

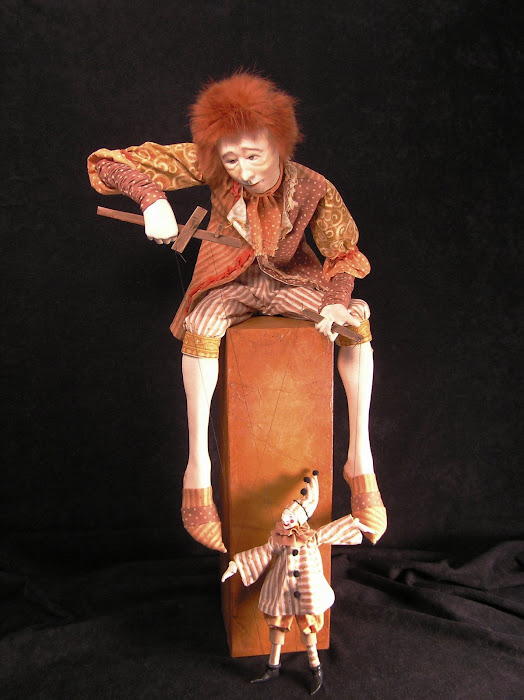
bye bye little guy ...

It's taken me longer than I planned. I'm thinking it might have something to do with the construction going on here at the house. ... ! ... We've had to empty out one room where all the sheetrock will be replaced, and that stuff is 'stored' in various places around the rest of the house. A few things are out of place in my studio to allow electricians access. Now we're having a grand hold on everything until windstorm inspectors can inspect the new room-in-progress where a balcony used to be. But I digress ...

Here he is, finished at last. He stands about 8 inches high, one of the smaller pieces I've made. His head and hands are polymer clay. The bicorne hat is felt and rattail cord with an embellishment of torn fabric and a knot of ribbon. His box is papier mache, painted and glazed with acrylics to complement the fabric of his costume. I haven't named him, but Bonaparte comes to mind... something about the way his right hand is posed.

Today I'll pack him and send him off to Atlanta. Happy travels little fella. I know you're going to love your new home!

Tuesday, April 28, 2009

back to dolls


Having to cancel my plans to attend ODACA Day in Atlanta this summer made it even more important that I send a helper donation for the event.
I'm working on this little jack-in-the-box-to-be ... as my donation. His box is made of papier mache with a painted design echoing the fabric I'll use for his costume. That piece of felt perched on his head will become a bicorne hat ... Napoleon style. The head and hands are polymer clay for the artist's instant gratification ... paper clay is still my favorite, but for this project it would just take too long! I'm still going to be dividing my studio time between dolls and my new-found love paper arts / collage. Life is full ... check back to see this project finished ...

Monday, March 30, 2009

old photos

I have a new project. I wasn't looking for a new way to occupy my time ... really I wasn't. It all started because I wanted to post that photo of myself at age 2 with the leaf rake. That photo was securely (!) stored in one of my mom's 'magnetic' photo albums that became so popular back in the 60s. I asked her if I could borrow the album for a couple of days, thinking I would just remove the photo, scan it, post it, put it back in place and return the album ... done. Right? Well, I couldn't budge the photo off the page. Couldn't position the whole page on the scanner because the pages are not removable from the album. Googled 'remove old photo from magnetic album.' Read about a couple of methods of removal and used the hair dryer and a flat x-acto blade, and after about an hour of careful, gentle heating and painstaking prying, the photo was free of its prison. Scanned it, photo-shopped out the crease in the middle, cropped it, warmed the color, and there you have me!

What is this new project I mentioned in the beginning? Removing all the old photos imprisoned in Mother's 'magnetic' albums. While I was reading how to remove the photos without damaging them, I also learned that those albums are archivally the worst thing that can happen to an old photo. The acid in the pages and the glue causes discoloration and deterioration of the image and the paper holding it, reducing them ... eventually ... to shreds and tatters! (sorry, I couldn't resist!) And it occurred to me that this would be a good project for my mom. My job will be to remove the photos from the old albums since her poor vision won't allow her to do so safely, and she will enjoy putting them in a new, archivally sound album. And that is a great excuse for a trip to Hobby Lobby ...

If you have any of those old 'magnetic' albums lying around, you just might want to take a look at the condition of the photos inside.

Friday, March 27, 2009

Since you asked, ... you did, didn't you? Ann Bell is an artist in the Houston area. Her art card class was such fun ... like a day of vacation. You show up on time and get to play in her studio, use her stash, pick her brain, and make new friends! What could be better? Learn more at www.annbell.net or go directly to the art card class information at http://www.annbell.net/ArtCardClass.htm. Class size is limited so don't delay!

Thursday, March 26, 2009

Such a long time between posts! When I started this blog it was going to be a showcase for my dolls. But ... well, I've just gotten into paper arts and it's consuming me! Thanks to a class from Ann Bell, I'm making art collage note cards and trying to figure out where I'm going to store my rapidly growing paper stash!


This is one of the cards I made in Ann's workshop. Now photography isn't one of my strong suits, obviously. I spent a lot of time behind the camera making sure the image was truly vertical and centered in the viewfinder. This is the resulting photo ... sigh ...

This next card is also from Ann's class. The card stock is the same color as the card in the first photo. More photography shortcomings! The metallic paper in this card is Joss paper, found in Asian markets ... and now on my 'must have' shopping list!


Some corrugated paper, more Joss paper, just the edges, and a snippet of some wallpaper. Again, the cardstock color is the same as the cardstock in the first photo ... just assume that is true for all these images ...


Card number five from the class. Some more corrugated paper, part of a tag, a small figure image from some wrapping paper, a snippet of a page of sheet music ... I love this stuff, and it sure fits in with the 'shreds and tatters' theme I started here. I'll post again ... I promise ... and show you pictures of the cards I'm creating on my own now where I will incorporate images of my dolls and some 'generic' traditional doll images found here and there. More soon ...